Плагины для sketchup при проектировании дома: понятие и виды- инструкции +видео и фото
Содержание:
- Setting preferences to customize your workspace
- Аналоги Google SketchUp
- Updating a scene
- Saving and reopening a model
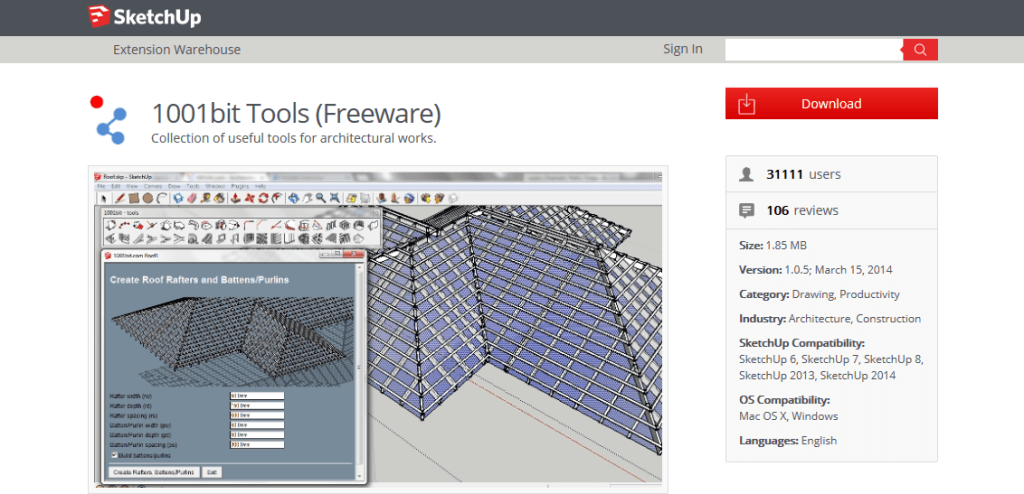
- Sketchup плагины для труб
- Choosing loading policy preferences
- Plugin: This Sketchup Joint Push-Pull Tool is Definitely a Sketchy Winner!
- Installing extensions manually in SketchUp
- Managing trust and signatures
- Sequencing scene tabs
- Sketchy:….and Bool Tools Gets the Final Sketchy!
- Отличие SketchUp Pro от SketchUp Make
- Plugin: Sketchup Custom Toolbars
- Opening files and recent files
- How to Install Extensions
- Viewing scenes in models imported from the 3D Warehouse
- Trying or purchasing extensions in the Extension Warehouse
- Managing trust and signatures
- PLUGIN: Follow and Rotate – Neat, but needs a little work
- Updating extensions
- Обзор интерфейса SketchUp
Setting preferences to customize your workspace
In SketchUp, preferences options enable you to customize your workspace.
To access these preferences, select Window > Preferences (Microsoft Windows) or SketchUp > Preferences (Mac OS X) from the menu bar. In the sidebar on the left, select the preference panel that you need.
The following table outlines how you can customize the workspace and what preference panel enables you to make a change.
Tip: SketchUp extensions, also called plug-ins, enable you to add specialized tools and features to SketchUp. To customize your workspace with extensions or manage you extensions preferences, log into the Extension Warehouse and use the extensions management features. See the Extension Warehouse section of the Help Center for details.
| To Do This | Open this Preference Panel | Good to Know |
|---|---|---|
| Set the default image editor. | Applications | Determines what image editor opens when you want to edit a texture in an external editor. Click Choose and select an application on your operating system. |
| Display crosshairs on your cursor that correspond to axes colors. | Drawing | Select the Display Crosshairs checkbox in the Miscellaneous area. |
| Activate the Paint Bucket tool after you click a material swatch (Mac OS X only). | Drawing | This checkbox is enabled by default. Deselect Auto-activate Paint Tool to disable it. |
| Toggle the Push/Pull tool’s pre-pick feature. | Drawing | Pre-pick is enabled by default so that you can select a face, orbit, and push/pull the face even when the selected face doesn’t appear in the current view. Select Disable Pre-pick on Push/Pull Tool to disable the feature. |
| Display a component bounding box and its edges in different colors. | Compatibility | This feature is disabled by default. Select the Bounding Box Only checkbox, and a component’s edges appear in a different color from the component box when you select the component. |
| Change the size of the toolbar buttons. | Workspace | The large buttons are enabled by default because they’re easier to see and use. For smaller buttons and a larger drawing area, deselect the Use Large Tool Buttons checkbox. |
| Select whether windows cascade and the default window size (Mac OS X only). | Workspace | On a Mac, windows cascade by default. Deselect Cascade Main Windows to turn off cascading. Click the Save Current Window Size button to make the size of the active window your default window size in SketchUp. |
| See the toolbars and panel trays after closing them. | Workspace | Click the Reset Workspace button and your toolbars and panels instantly reappear in the most recent docked position . |
Аналоги Google SketchUp
SketchUp считается простым редактором для работы с 3D и 2D моделями. Его функционала вполне достаточно для выполнения самых необходимых действий. Поэтому он подходит не только для любительского, но и профессионального редактирования.
Как и у любой другой программу, у SketchUp есть свои аналоги, к которым относятся такие приложения, как:
- Blender
- AutoCAD
- ArchiCAD
- K-3D
- Art of Illusion
- Zmodeler
Каждый из них имеет свои особенности и недостатки, поэтому подходит для создания предметов интерьера, моделирования игровых персонажей и их последующего внедрения или других целей. Все они имеют схожий между собой функционал и могут частично или полноценно заменить друг друга.
В отличие от них, SketchUp Pro поставляется сразу с дополнительными компонентами Style Builder и LayOut, которые позволяют осуществлять более реалистичную визуализацию созданных моделей, проектов, а также позволяют работать с документацией (чертежи).
Плагины для Google SketchUp Программа проектирования имеет много встроенных компонентов, к примеру, в ней есть библиотека, в которой имеется мебель, текстура материалов и многое другое. Но имеются и независимо компилируемые программные модули, которые динамическим образом подключаются к главной программе и предназначены для того, чтобы расширить ее возможности либо плагины.
Эти уроки очень полезны для тех, кто хочет создать у себя на дачном участке красивый дизайн или можно спроектировать интерьер дома. Рассмотрим основные плагины для программы Google SketchUp pro: V-Ray дает возможность демонстрировать 3d элементы модели; Make Faces может облегчить работу с чертежом и схемой, которые можно импортировать из AutoCAD; Pen Tool+ осуществляет работу в качестве дополнения к инструментам Перо и так далее.
Имеются также плагины, помогающие демонстрировать 3d модели, увеличивают некоторые инструменты, ими можно усовершенствовать анимации, экспортировать в определенный формат некоторые проекты. Плагины можно скачивать и free – свободно. Как применять какой-то из плагинов, можно взглянуть в онлайн-уроки.
Updating a scene
Updating a scene saves any changes that you make to a scene after you create it. To update a scene, follow these steps:
-
Select Window > Scenes to open the Scenes dialog.
Open the Scenes dialog in the Default Tray. - In the Scenes dialog, select the scene you want to update.
- Click the Show Details icon () and make sure all the properties you want to save with the scene are selected.
- Click the Update Scene icon () in the upper left of the Scenes dialog.
- In the Scene Update dialog box that appears, you can deselect any properties you don’t want to save with the update. Remember that if an item wasn’t selected in Step 3, that property doesn’t save, even if you select it in the Scene Update dialog box. After you’re done selecting or deselecting properties, click Update.
Tip: If you don’t like keeping the Scenes dialog open, you may prefer to update a scene by context-clicking a scene’s tab and selecting Update. In the Scenes dialog, you can also click the Details arrow () and select Update Scene.
Saving and reopening a model
To save your model, follow these steps:
- On the menu bar, select File > Save. If this is the first time you’re saving a model, the Save As dialog box appears, as shown here. To save an already saved model with a new name, select File > Save As.
- Choose where you’d like to save your model.
- In the File Name box, type a name for your model. SketchUp model files end with the file extension.
- In the Save As box, type a name for your model. SketchUp model files end with the file extension.
- (Optional) If you’d like your model to be compatible with earlier versions of SketchUp, select a version from the Save As Type drop-down list.
- Click the Save button.
Tip: After you save a model, you can reopen it later and continue working on it. (Simply double-click the file wherever you’ve saved it, or in SketchUp, select File > Open.) If you’re not sure where a file is saved, hover over the file in the Welcome to SketchUp window, and you can see the path to the file, as shown in the following figure. Or if your model is complete, you can show it off by exporting it as a graphic or creating a virtual walk-through.
Backing up a SketchUp file or restoring an Auto-save file
SketchUp creates a backup file the second time you successfully save your SketchUp file and any subsequent saves. This file is an exact copy of the previously saved version of the file. The backup file uses the naming convention on Windows and on macOS, and it’s located in the same folder as the original file.
If SketchUp crashes while you’re working on a model, the recovered file is not deleted. By default, while you’re actively working. You can recover your work from the point the last automatic save was performed by opening the recovered file. To find and open a recovered file, open the Welcome to SketchUp window, select the Files tab, and select the file you want to recover from the Recent list.
- Eraser tool
- Line tool
- Orbit tool
- Paint Bucket tool
- Push/Pull tool
- Select tool
- SketchUp
- Styles browser
- Zoom Extents tool
Sketchup плагины для труб
SketchUp запись закреплена
Самые лучшие из бесплатных плагинов конечно же пишет Fredo6. А самые нужные из его плагинов и полностью обновленные на сегодняшний день вы можете скачать здесь.О многих из них уже было написано здесь в группе, но о некоторых я еще не писал.Библиотека libFredo6 конечно же включена!
Вот что вошло в этот набор:
BezierSpline — рисование и редактирование кривых, полилиний, сплайнов Curviloft — моделирование сложных поверхностей методами скиннинга и лофтинга Curvizard — преобразование, улучшение, оптимизация, исправление кривых, восстановление взорванных кривых из сегментов FredoScale — великолепные инструменты расширенного масштабирования, поворота, растягивания, скручивания, искажения и изгиба объектов RoundCorner — скругление и снятие фасок с ребер HoverSelect — расширенный инструмент выделения ребер (как кисточкой) JointPushPull — экструдирование непланарных (криволинейных) поверхностей по нормалям, по нормалям каждого полигона и по вектору ToolsOnSurface — рисование простейших 2D-фигур (круги, дуги, прямоугольники), а также редактирование и смещение контуров на криволинейных поверхностях TopoShaper — преобразование горизонталей в рельеф с регулярной сеткой (не работает в SU 7)
А еще набор FredoTools, который включает полезные инструменты: RevertCurve — изменяет направление кривой (нужно некоторым другим плагинам) CurviShear — строит каркас для лофтинга пандусов (применяется совместно с Curviloft) ReportLabelArea — создание простеньких отчетов (спецификаций) по площадям для каждого материала с возможностью экспорта ConstructFaceNormal — строит нормаль к поверхности MarkVertices — строит вспомогательные точки для вершин выделенных фейсов и линий CountFacesBySides — подсчитывает разные типы фейсов в объекте (треугольники, четырехугольники, и 5 и более) RemoveLonelyVertices — очистка ненужных вершин и лишних сегментов в прямых линиях ThruPaint — это самый лучший инструмент для нанесения, проецирования и редактирования текстур на поверхности ReverseOrientFaces — инструменты для быстрого переориентирования вывернутых фейсов
Внимание. В большинстве плагинов Fredo6 при нажатии на TAB на клавиатуре открываются полезные дополнительные опции.Если у вас установлены какие-либо из плагинов Fredo6, то лучше удалите их, особенно если устанавливаете RBZ (при установке RBZ почему-то старые файлы с тем же именем не заменяются)
Источник
Choosing loading policy preferences
You can choose an extension loading policy that determines what extensions can and cannot be loaded when SketchUp starts.
SketchUp has three loading policy modes:
- Identified Extensions Only: In this mode, SketchUp loads an extension only if a registered SketchUp developer digitally signed the extension.
-
Approve Unidentified Extensions: This mode lets you choose which extensions load each time SketchUp starts. You see a list of found extensions and Ruby files in the Load Unidentified Extensions? dialog box. Select which of these you want to allow to load. SketchUp will remember which extensions you have approved. You see the approval dialog box each time you start SketchUp so you can change your approvals before any extensions are loaded.
Note: Identified extensions do not appear in the list when SketchUp starts. They load automatically.
- Unrestricted: This mode is the least secure. All extensions and Ruby files load when SketchUp starts, and the Load Unidentified Extensions? dialog box won’t open. Use this mode only if you trust all the extensions that you have installed.
Tip: Unidentified extensions cannot be loaded while in Identified Extensions Only mode. You can switch to Approve Unidentified Extensions mode and then .
Note: Unrestricted is the default extension loading policy.
You can switch between modes at any time. However, to unload extensions that SketchUp has already loaded, you need to restart.
To choose your extension loading policy, follow these steps:
- Select Extensions > Extension Manager.
- In the Extension Manager window that appears, click the gear icon in the upper right.
- In the Settings window that appears, select your desired loading policy and click the Confirm button.
- Extension Warehouse
- installing extensions
- plugin
- extensions
- plugins
- extension
- install extension
Plugin: This Sketchup Joint Push-Pull Tool is Definitely a Sketchy Winner!
18
09
2008
Without further delay….here is the first Sketchy winner of 2008…Fredo6 of Sketchucation.com for his plugin – Joint Push Pull – Visual Edition. I don’t think many, if any, would argue that there is a more useful, more seamlessly integrated tool for Sketchup.
I have been using this plugin since it’s introduction and while I have dozens of plugins and tools, none have proved more useful to me in my daily illustration grind with Sketchup. This plugin adds some badly need functionaliy to Sketchup, the ability to push and pull (with loads of options mind you) any faces, including and most importantly, curved faces all the while giving you visual feedback prior to making the changes permenent in your model. How totally kewl is that! I have used these features extensively in many models, including (extensively mind you) on my 50’s sci-fi rocket model. Here is a screen capture of it in use :
:
All this coupled with all the options you have for performing these operations makes it a shoe-in for a Sketchy! Thank you Fredo6 for providing such an innovative nad highly useful plugin for our favorite 3D program! Kudos and we look forward to updates and, perhaps, another Skethcy-worthy plugin! 8)
You can download it from Sketchucation or get it here
Comments : Tags: sketchup, sketchup award, sketchup award winner, sketchup plugin, sketchup tool, sketchy, sketchy winner, sketchy winning plugin
Installing extensions manually in SketchUp
If you download an extension from the Extension Warehouse via a web browser or from a developer’s website, your extension is packaged as an file that you can install manually. Here are the steps you need to follow:
- In SketchUp, select Extensions > Extension Manager. The Extension Manager window appears.
- Click the Install Extension button.
- In the Open dialog box that appears, navigate to the file saved to your computer, select the file, and click OK (Microsoft Windows) or Open (Mac OS X).
- When SketchUp warns you about installing only extensions from trusted sources, click Yes to proceed and install your extension. (This assumes you do, in fact, trust the source of your extension.)
Managing trust and signatures
Starting with SketchUp 2016, registered extension developers can claim their software by signing it digitally. This signature says, “I made this,” but in a secure coded format. In other words, when an extension is signed, the extension file contains a signature file that is securely tied to the developer’s Extension Warehouse account. An extension may be unsigned if you installed it manually.
Tip: Download the most recent version of any extension you use from the Extension Warehouse, the author, or the original trusted download source. You might contact the author of any extensions that are not digitally signed and ask them to look into this new feature.
The Extension Manager enables you to see whether an extension is signed. If you have an unsigned extension, you can tell SketchUp whether you trust the file, which determines whether the extension can be enabled at startup. Follow these steps:
- Select Extensions > Extension Manager. The Extension Manager window appears.
- In the Extension Name column, you see whether an extension is signed. Click the right-pointing arrow to see an extension’s details, and you can view the extension’s signature information and designate an unsigned signature as trusted.
Sequencing scene tabs
SketchUp adds scene tabs and lists of scenes in the Scenes dialog based on the order in which you create the scenes. However, this order may not be what works best. For example, in the following figure, say you want to move the interior scene later in the sequence, after all the exterior scenes.
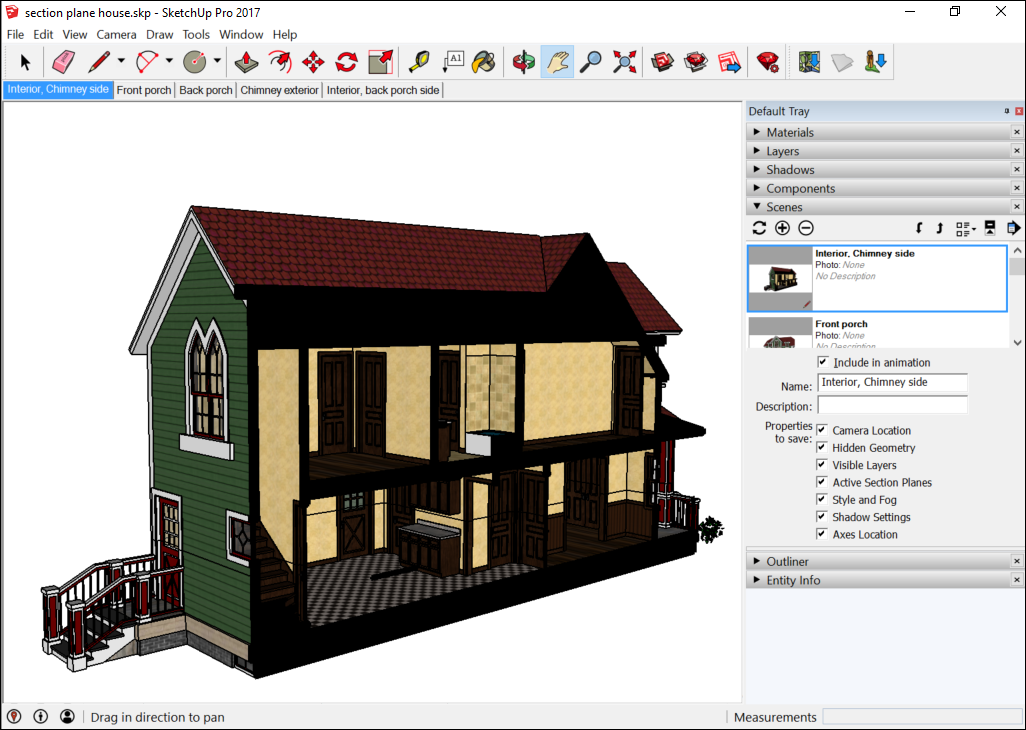
To change the sequence of your scenes, you use either the scene tab’s context menu or the Scenes dialog:
- Scene tab context menu: Context-click the tab you want to move and select Move Left or Move Right. Repeat the command if you want to move the scene more than one position in the tab order.
- Scenes dialog: Select the scene from the list and click the Move Scene Down icon () or the Move Scene Up icon () in the upper right. The tab order updates to reflect the order in the Scenes dialog.
Sketchy:….and Bool Tools Gets the Final Sketchy!
25
03
2009
This was supposed to be awarded back in December 2008 but was severly delayed. Bool Tools by Whaat from Sketchucation – for sale for a reasonable $10.00 on the Smustard website – adds a much, much, MUCH needed functionality to Sketchup. Anybody who has worked with SU for more than 10 minutes can attest to how sorely missed boolean modeling functions are when comparing SU to other 3D modeling software. With a simple, intuitive workflow and the fact that it just plain works and works the way you expect in most situtations – it hands-down blows away any other Sketchy contenders for the final Sketchy of 2008.
Congratulations to Whaat – keep up the good work and we look forward to your next plugin!
Comments : Tags: bool tools, boolean modeling, boolean tools, sketchup, sketchup plugin, sketchy award
Отличие SketchUp Pro от SketchUp Make
Программа SketchUp поставляется в двух вариантах:
- Pro — полная версия для коммерческого использования;
- Make — ограниченная по функционалу версия для бесплатного использования.
Каждая из версий позволяет создавать 3D модели, настраивать интерфейс, сохранять собственные проекты, пользоваться функцией импорта и экспорта. Другими словами, использовать базовые возможности программы.
В отличие от SketchUp Make, Pro версия позволяет:
- Импортировать и экспортировать CAD и PDF файлы;
- Создавать многостраничные презентации и рабочие чертежи;
- Экспортировать анимацию;
- Использовать стили эскиза «от руки»;
- Создавать, экспортировать и импортировать файлы формата IFC;
- Использовать более широкие настройки камеры.
Если вы не знаете какую версию выбрать, то загрузите последнюю версию SketchUp. Более ранние могут понадобиться только в том случае, если вы хотите открыть, который был создан в предыдущей версии программы. Но и для этого лучше воспользоваться функцией экспорта/ импорта документов.
Plugin: Sketchup Custom Toolbars
1
08
2008
Jim Foltz, moderator for the Sketchup Community Forums, has released an incredibly useful script called Custom Toolbars. With it you can build your own customized Toolbars from a large, preconfigured list of commands, which should be expanding as Jim finds the time to work on it. Creating a Toolbar is easy; Custom Toolbars creates a “Toolbars” folder in your SketchUp Plugins folder. Create a .txt file in this Toolbars folder and give it the same name as you want the name of the Toolbar. Then, edit the .txt file and simply list the name of the tool you would like to appear in the Toolbar.
The script comes with really cool icons for each of the commands and the installation instructions are really easy to follow. This one is definitely worth the download! Thanks Jim!! 8)
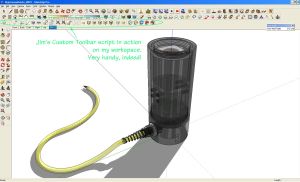
My Sketchup Workspace using Jim’s Custom Toolbar Script
Comments : Tags: 3d architectural rendering, 3d modeling, 3d rendering, 3d rendering software, 3d software, architectural design, architectural led lighting, architectural lighting, architectural lighting design, architectural lighting design tools, Architectural Lighting Industry, architectural visualization, artistic lighting, designing with light, google sketchup, interior lighting, kerkythea, kerkythea rendering system, led architectural lighting, light modeling, lighting artist, lighting design, lighting design software, lighting design tools, lighting designers, lighting engineering, lighting visualization software, Office Lighting, office lighting design, sketchup, Solid-State Architectural Lighting, solid-state lighting design, solid-state office lighting, visualization software
Opening files and recent files
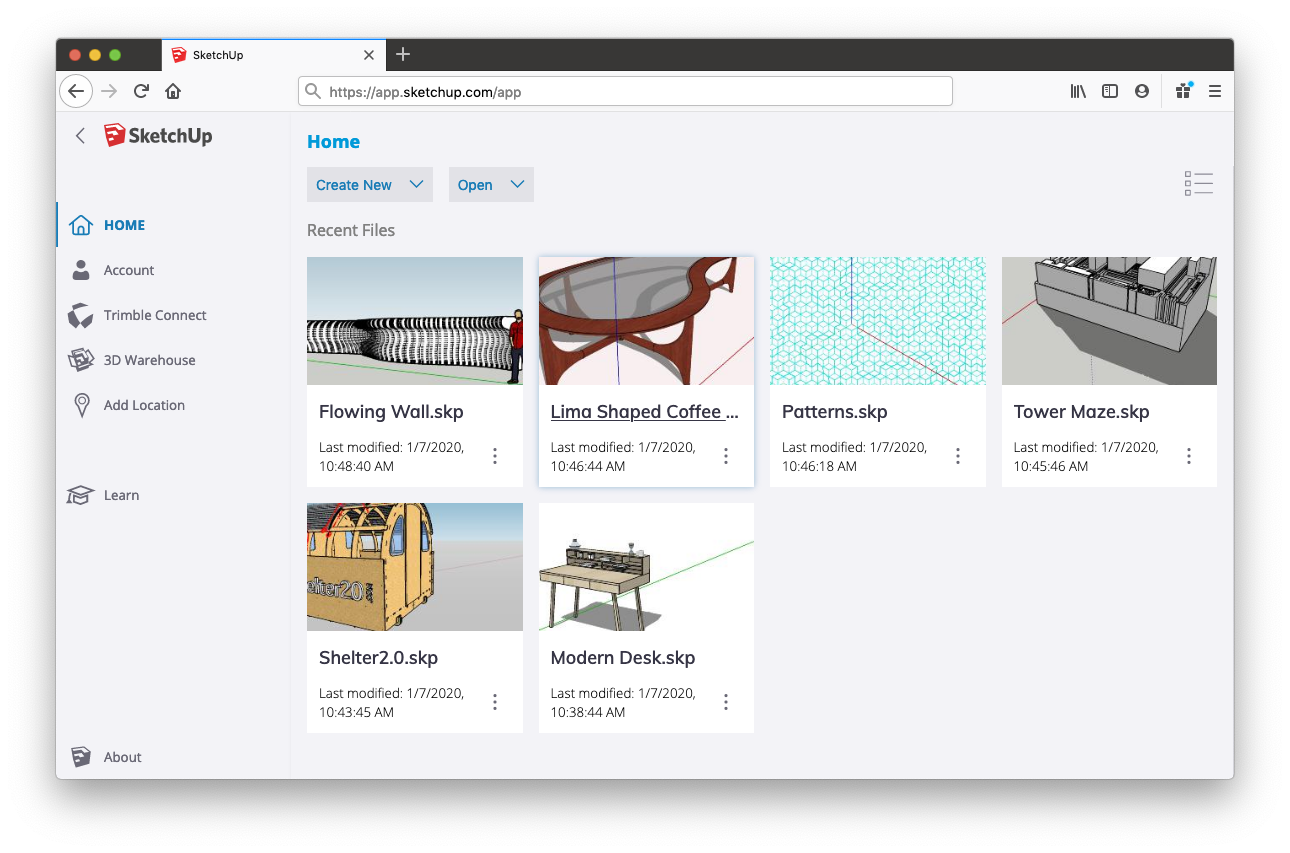
When you launch SketchUp for Web, you’ll have the option to open a model from the Home tab (using the Open button or by choosing a recent file), or the Trimble Connect tab. While modeling, you can return to the Home tab or Trimble Connect tab, by clicking the ‘hamburger’ menu icon in the very top left of your screen. You can also choose the ‘Open’ command in the File operations menu ().
Tip: You can also open SKP model in the Home tab.
Recent files
If you choose to open a recent file — a model that you recently opened or saved in SketchUp for Web — simply double-click its listing in the Home tab (or single-click its file name). This is probably the fastest way to resume working on a model saved in Trimble Connect.
Your list of recent files is actually cached (or stored) in the browser that you SketchUp for Web with. If you clear your browser cache, use another browser, or use another device, you won’t see your recent files. If this happens, don’t worry, just use the Trimble Connect tab to find and open your file.
Open files from Trimble Connect
|
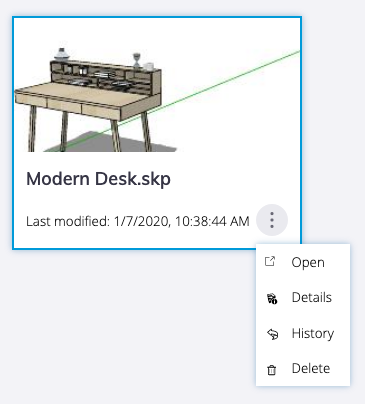
When you choose to Open a file from Trimble Connect, you’ll need to navigate to Project where you saved your file — probably the SketchUp folder if you have a Free subscription — to find your file. When you do, just double-click it’s listing or single-click its name. If you have a lot of files stored in your Project, you may find it useful to change from the default thumbnail view to list view (). In list view, you can sort your file list by name, last modified date, or file size. This can make it a bit easier to find things in a large project. In either list view or thumbnail view, each model has a file options menu. From here, you can choose to open, delete, view file details, or view . These options are also available in the Home tab. |
 |
How to Install Extensions
Method 1: Automatic
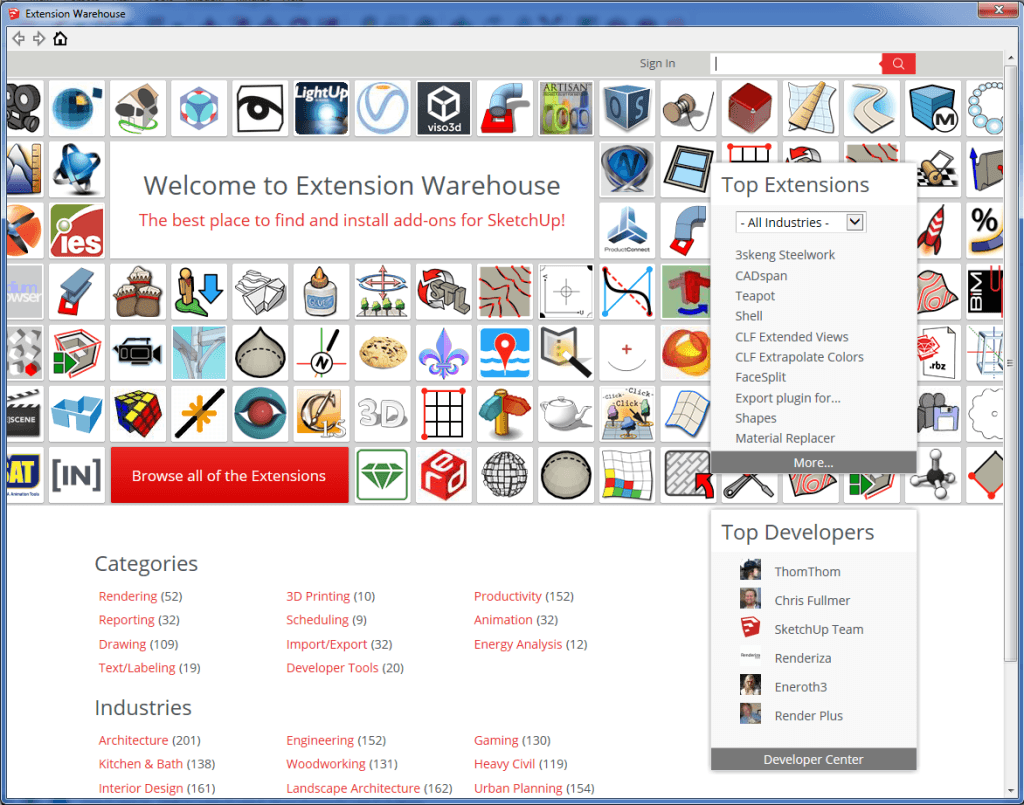
If you have Sketchup 2013 or newer, you will be able to access to the extension warehouse. Click here to download the latest version of Sketchup. To access the extension warehouse go to Window > Extension Warehouse.
After clicking that you should see something similar to this window:
- Once you have the Extension Warehouse window open, make sure you’re signed in to your account. The ‘Sign in’ button is located in the top right. If you’re not signed in you won’t be able to download or install the extensions this way.
- Navigate around for an extension that entices you. Once you’ve found one click the red download button in the upper right corner.
You’ll be prompted by a few pop-ups. Click through them and your extension should be installed!
Method 2: Manual
- You may have found an extension on the web and that’s perfectly fine. Make sure you .rbz file is saved somewhere were you can easily find and receive it. I like to put mine in the Sketchup/Tools folder. In older versions you might want to use the Sketchup/Plugin folder.
- Go to Window>Preferences
- On the left make sure you have Extensions selected
- Click Install Extension at the bottom left
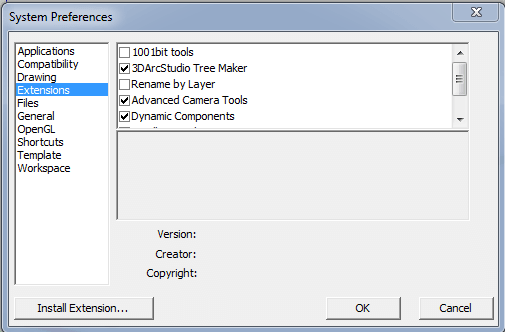
- Navigate to location you saved your .rbz file, select it, and hit OK.
- Click through the pop-ups and you’re cooking with fire!
- Note: If you’d like you toggle your extensions on or off, you can do that using the check boxes next to your extension name in the Preferences dialog.
Viewing scenes in models imported from the 3D Warehouse
If you download a model from the 3D Warehouse into SketchUp, your download is inserted into your model as a component. However, components don’t have scenes.
Tip: To see and access the scenes, you must open the model in a new instance of SketchUp, so it opens as a full model rather than as a component in a model.
To open a 3D Warehouse download as a model, click No when a message asks, “Load this directly into your SketchUp model?” You then see another message that asks, “Do you want to open or save this file?” Click Open and you can see and use any scenes saved with the model.
For details about saving, sharing, or downloading models via the 3D Warehouse, see the 3D Warehouse section of the Help Center.
- Pages Dialog
- Scenes Dialog
- scene
- scenes
- animate
- animation
- animating
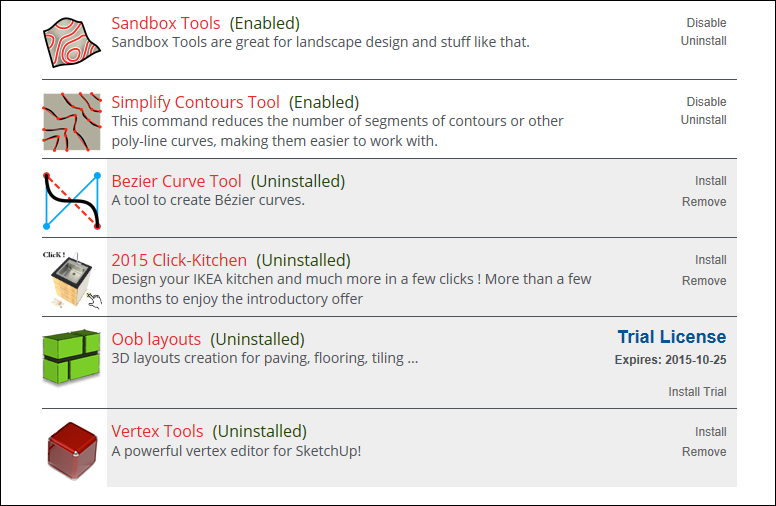
Trying or purchasing extensions in the Extension Warehouse
Whether you’re signed in to the Extension Warehouse through your browser or SketchUp, you can purchase an extension. However, to install a trial or purchased extension, you need to be signed in to the Extension Warehouse via SketchUp.
The following steps walk you through making a purchase:
- On the extension details page, click the Purchase button. (If you can download a trial before you buy, you see an Install Trial from SketchUp link. To install a trial, see the upcoming steps for installing a trial or purchase.)
- When prompted, enter your billing and payment information. Billing information is required to verify your credit card. Your receipt is emailed to the email address you use to sign in to Extension Warehouse. If you don’t receive a receipt email shortly after your purchase is complete, check your spam folder.
Tip: After you purchase an extension, the Extension Warehouse doesn’t offer refunds. If you’d like to try out an extension before you purchase it, look for an Install Trial button, which enables you to try how the extension works before you buy it. If you’re having trouble purchasing an extension or would like to contact us about an Extension Warehouse purchase you’ve made, fill out our Customer Service Contact form and, from the You Would Like To drop-down list, select Resolve a Purchasing Issue.
To install a trial or purchased extension, follow these steps:
- In SketchUp, select Extension > Extension Warehouse and sign in to the Extension Warehouse.
- To install a trial, search for the extension you want to try, and on the extension details page, click Install Trial. If you’ve already purchased an extension, skip to Step 3.
- From the user menu, select My Extensions.
- On the My Extensions tab, scroll down to the trial extension or the purchased extension that you want to install and click the Install Trial or Install link. In the following figure, you see an Install Trial link.
- When SketchUp asks whether you trust the author and want to continue installing the extension, you need to click Yes to proceed. After a few moments, a dialog box confirms that your extension was installed.
Managing trust and signatures
Starting with SketchUp 2016, registered extension developers can claim their software by signing it digitally. This signature says, “I made this,” but in a secure coded format. In other words, when an extension is signed, the extension file contains a signature file that is securely tied to the developer’s Extension Warehouse account. An extension may be unsigned if you installed it manually.
Tip: Download the most recent version of any extension you use from the Extension Warehouse, the author, or the original trusted download source. You might contact the author of any extensions that are not digitally signed and ask them to look into this new feature.
The Extension Manager enables you to see whether an extension is signed. If you have an unsigned extension, you can tell SketchUp whether you trust the file, which determines whether the extension can be enabled at startup. Follow these steps:
- Select Extensions > Extension Manager. The Extension Manager window appears.
- In the Extension Name column, you see whether an extension is signed. Click the right-pointing arrow to see an extension’s details, and you can view the extension’s signature information and designate an unsigned signature as trusted.
PLUGIN: Follow and Rotate – Neat, but needs a little work
16
10
2008
 Here’s another interesting plugin with a lot of potential. Follow and Rotate (FAR) and is definately a niche plugin and can be a bit quirky/buggy but could be really useful if you’re doing some specialized modeling (cables, ropes, spires, steeples, stalagtites/stalagmites, etc…). FAR does what it says, you select a face or faces and then select a line, arc, or a series of both welded (another highly useful, potential Sketchy winning plugin) into one and then click Follow & Rotate in the Plugins menu which brings up a small dialog. Make sure that you select the face (not its surrounding lines). You tell the plugin how many degrees of rotation you want the face to rotate as it follows the line and you also tell it what factor to scale to as it follows the line. Click OK and see the results. Sometimes it works, other times it doesnt (for me I cannot get it to work with a straight line as a follow path and everytime I run the plugin, it seems to rotate my follow path down to the ground plane) but when it does work, it produces neat results – don’t count this one out and make sure to give it a try if you find yourself looking to do this kind of modeling.
Hopefully wikii from Sketchucation.com will continue work on this promising script.
Comments : Tags: 3d design, 3d plugin, 3d rendering, free plugin, free sketchup plugin, sketchup, sketchup addon, sketchup plugin
Updating extensions
A developer might update an extension to add a feature, fix a bug, or make an older version of an extension compatible with Ruby 3.0.
To update extensions in the Extension Warehouse, follow these steps:
- In SketchUp, select Extensions > Extension Warehouse and sign in to the Extension Warehouse.
- Select My Extensions from the user menu. The Extension Warehouse opens to the My Extensions tab shown in the following figure. This tab shows all the extensions you’ve installed through the Extension Warehouse. (If you installed an extension manually from another source, that extension won’t appear here. See Adding Extensions to SketchUp for details about manual installation through SketchUp Preferences.)
- To update all your extensions at once, click Update All at the top right of the My Extensions tab. To update a specific extension, click the Update option to the right of the extension’s name.

If you install an extension through the Extension Warehouse (rather than manually), the Extension Manager knows when an extension update is available.
When an extension has an update, a couple of alerts let you know:
- A message appears on-screen.
- A little red circle appears next to the Manage tab, as shown in the following figure. The number in the circle reflects the number of updates.
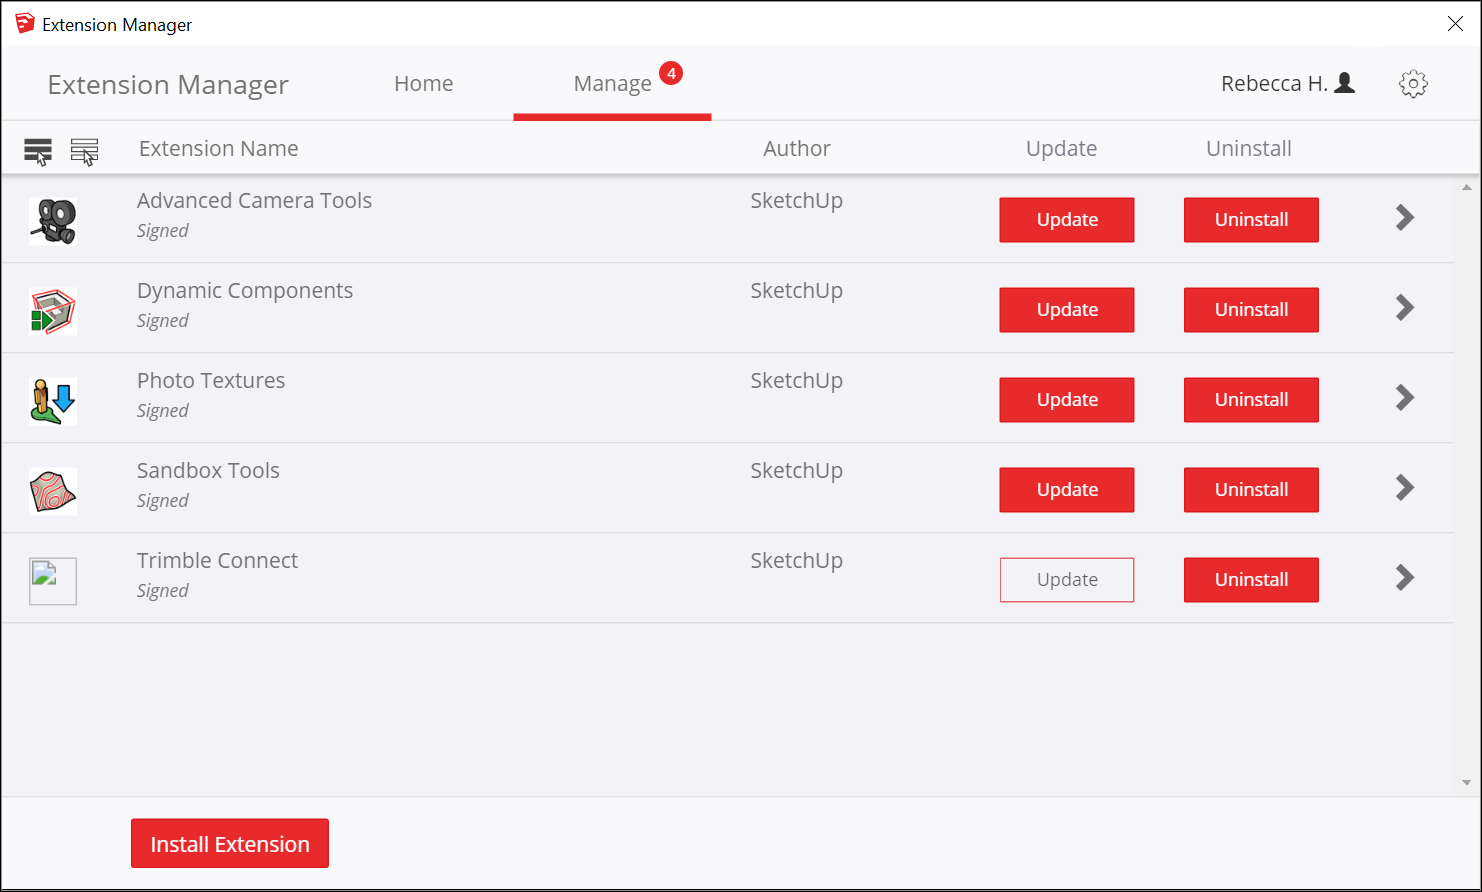
To update an extension in the Extension Manager, follow these steps:
- In SketchUp, select Extensions > Extension Manager. The Extension Manager window appears.
- Click the Manage tab at the top.
- Click the Update button next to the extension that you want to update. Or to install all the updates at once, select the extensions you want to update and click the Update option that appears at the very top of the column.
Обзор интерфейса SketchUp
Когда откроется SketchUp, готовый для начала создания 3D-модели, вы увидите экран, который включает в себя следующее:
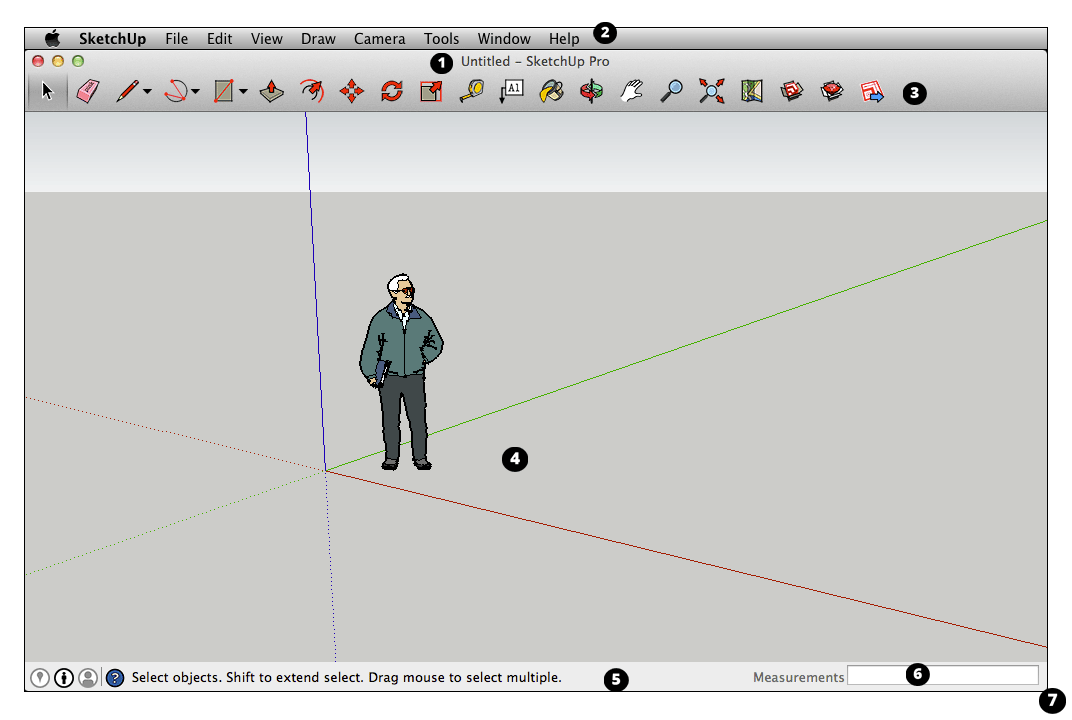
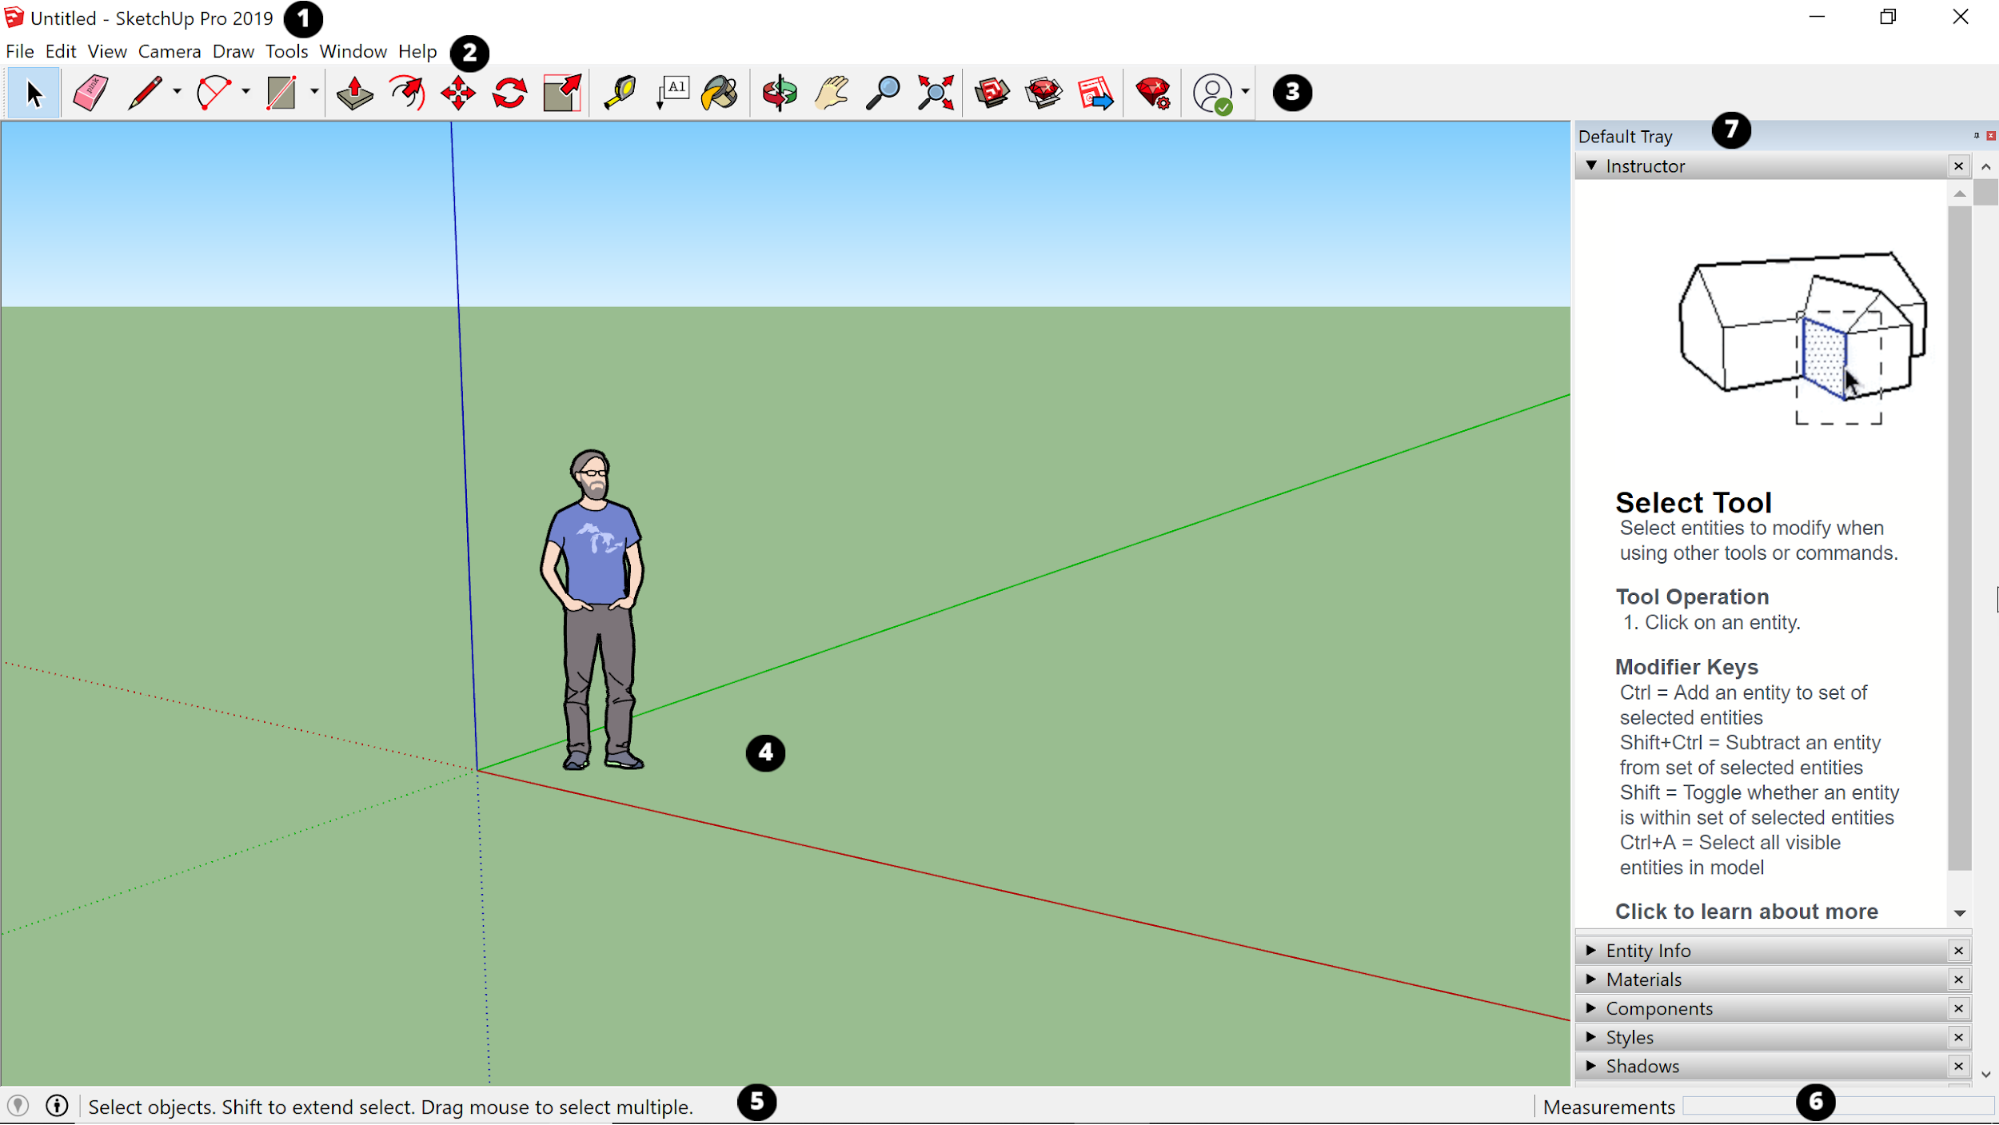
Строка заголовка
Строка заголовка содержит стандартные элементы управления окном (закрыть, свернуть и развернуть) и имя открытого файла. При запуске SketchUp открытый файл имеет имя «Без названия», что означает, что вы еще не сохранили свою работу.
Панель меню
Большинство инструментов, команд и настроек SketchUp доступны в меню на панели меню. Это такие меню, как SketchUp (только Mac), «Файл», «Редактирование», «Просмотр», «Камера», «Рисование», «Инструменты», «Окно» и «Справка».
Панель инструментов «Начало работы»
Когда вы начинаете использовать SketchUp, панель инструментов «Начало работы» отображается по умолчанию. Она содержит основные инструменты, необходимые для создания 3D-моделей.
Чтобы отобразить дополнительные панели инструментов, выберите Просмотр > Панели инструментов. В открывшемся диалоговом окне «Панели инструментов» выберите панели инструментов, которые хотите отобразить, и нажмите «Закрыть». В macOS вы можете отображать панели инструментов, выбрав Просмотр > Панели инструментов. (Дополнительные сведения о панелях инструментов и их настройке см. в разделе Настройка SketchUp Справочного центра.)
Совет. Эта статья познакомит вас с несколькими основными инструментами. По мере того, как вы продолжите изучать процесс создания 3D-моделей в SketchUp, инструктор научит вас (или напомнит), как использовать каждый инструмент. Дополнительные сведения см. в разделе .
Область рисования
Область рисования — это место, где вы создаете свою модель. Трехмерное пространство области рисования визуально определяется осями рисования, которые позволяют чувствовать направления в трехмерном пространстве во время работы.
Область рисования также может содержать простую модель человека, чтобы дать вам ощущение трехмерного пространства.
Строка состояния
Когда вы начинаете работу со SketchUp, двумя важными элементами в строке состояния являются советы посередине и поле «Измерения» справа:
- Советы по использованию инструментов. В средней части строки состояния щелкните значок вопросительного знака, чтобы отобразить окно Инструктора, в котором представлена основная информация об использовании инструмента, выбранного на панели инструментов. В средней области также отображается краткое описание по использованию выбранного инструмента. Эта область полезна, если вы не знаете, как работает инструмент.
- Поле «Измерения». Это поле является важным инструментом для создания точных моделей. В нем отображаются размеры по мере рисования. Вы также можете использовать это поле для управления выбранными объектами (например, для создания линии определенной длины) или для создания равномерно распределенных копий объектов (например, столбов, ограждений или жилых блоков в постиндустриальной антиутопии).


Совет. Поле «Измерения» исчезло? Наиболее вероятная причина в том, что размер окна SketchUp больше доступной области просмотра экрана. Чтобы восстановить вид окна «Измерения», нажмите кнопку «Развернуть» в строке заголовка.
Если вы являетесь пользователем Windows и включили параметр «Автоматически скрывать панель задач», поле «Измерения» может скрыться за панелью задач при ее отображении. В этом случае поле «Измерения» снова появляется, когда вы закончите использовать панель задач.
Примечание. В левой части строки состояния вы найдете кнопки для геолокации и получения кредита. Эти параметры помогут вам работать с расширенными функциями SketchUp, которые выходят за рамки данной статьи.
Панели по умолчанию
В правой части экрана вы видите область панелей, включая «Инструктор», «Материалы», «Стили» и т. д. Область по умолчанию появляется при открытии SketchUp, но вы можете закрыть область панелей по умолчанию, нажав кнопку «Закрыть» в правом верхнем углу. Переключите область, чтобы отобразить или скрыть ее, в подменю Окно > Область по умолчанию.
В правой части экрана вы видите область панелей, включая «Инструктор», «Материалы», «Стили» и т. д. Область по умолчанию появляется при открытии SketchUp, но вы можете закрыть любую область, нажав ее кнопку «Закрыть». Чтобы повторно открыть область, выберите ее в меню «Окно».